Procedural Dungeon Generator
The foundation for this generator is based on the Tutorial series posted by Toadnet. To learn how to make a tile map dungeon generator from scratch I highly recommend supporting his channel.

This is the documentation for the full Procedural Dungeon Generator project. This project is under development and continues to receive new features and updates. For anyone interested in trying the generator before purchasing check out the free lite version HERE.
Features:
Scalable Grid based generation with modular tiles
Ability to adjust grid scale, room size, room complexity, and path complexity
Procedural key and lock distribution to influence progression
Supports multi story rooms for height variation (only generates corridors on 1 level)
Populates dungeon with room relevant assets
Easy to modify datatable for custom rooms, paths, and decoration control
Generates a full dungeon map and mini-map at runtime
Overview
This is a grid based dungeon generator that uses a 500x500x500 tileset consisting of walls, floors, ceilings, and inner/outer corners. On construct the generator uses these tiles to build multiple paths of rectangular rooms within set X and Y parameters, shapes them by randomly removing tiles, and connects them with corridors made of the same tileset.

The size and number of the rooms, as well as the frequency of the tile culling for shaping can be controlled from the details panel. In addition to this base functionality this generator can build taller rooms up to a defined height, as well as assign each path or individual rooms a different themed tileset declared and organized in the DefaultRoomData datatable.
On runtime the dungeon is populated with elevators, doors, keys, lights, enemies, and multiple sizes of decoration blueprints procedurally placed to fill the floorspace of each room. The number of decorations, rooms they appear in, and rarity of spawning can be set along with each tileset in the datatable.

Initial Setup
To set up the dungeon first drop the dungeon blueprint into the level and check SpawnTiles under the Editor Tools. By default the dungeon spawns 5 branching rooms ending with a boss room.
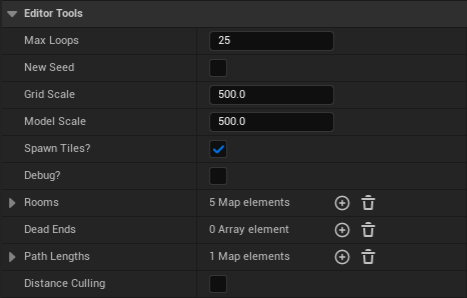
Editor Tools:
Max Loops
When removing tiles from a room, the dungeon loops through the room’s tiles to find a valid tile to remove without breaking the room. The max loops determines how long the generator searches for a valid tile without failing out. increase this number to reduce the chance the generator will fail to cull tiles from rooms.
New Seed
To generate a new random seed check the New Seed box.
Grid Scale
This is the scale of the dungeon generator's grid. If you wish to use a grid other than 500x500 or different from the grid size of your tileset, adjust this parameter to scale the dungeon to the desired grid. All meshes and decorations will scale accordingly to fit within this new grid.
Model Scale
This is the scale of your desired static mesh tileset. The default tiles are built on a 500x500 grid. When choosing or importing a custom tileset enter the scale of your modular grid so the models can be scaled appropriately when choosing a grid scale for the generator.
Spawn Tiles
Spawn tiles is true by default. Uncheck this box while you’re making changes to large dungeons so you don’t have to wait for the dungeon to rebuild itself with each change
Rooms (Uneditable info for Debugging)
This opens a dictionary of each room successfully spawned in the dungeon, with each key being a vector of the room’s location relative to the dungeon, and the value representing the extents of that room in tiles
Dead Ends (Uneditable info for Debugging)
This is an array of the locations relative to the dungeon where rooms attempted to spawn before failing out and being forced to branch off of another previous room
Path Lengths (Uneditable info for Debugging)
This is a dictionary showing each path and how many rooms were spawned within it.
Distance Culling
Toggles dynamic distance culling which only allows dungeon tiles and connected decorations to render if they’re within range of the player. This can be toggled off to view the entire structure in the editor but should be set to true before runtime to improve performance.
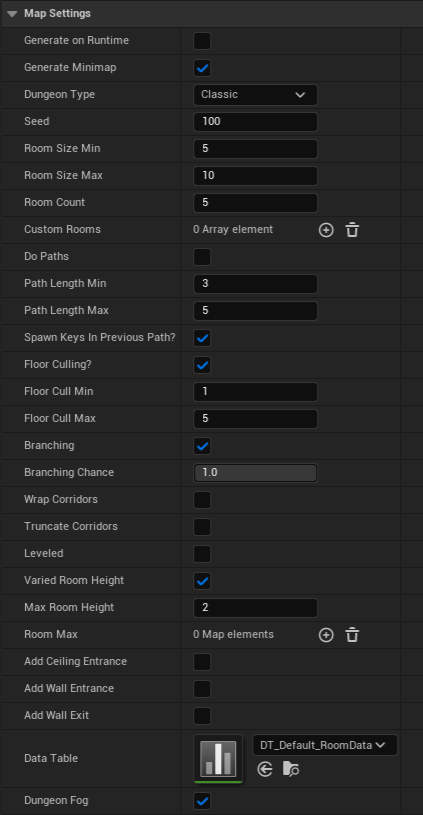
Map Settings:
Generate on Runtime
This deactivates the generation on Construct and assigns a new random seed on begin play to generate different dungeons each time the level is loaded.
Generate Minimap
This Toggles the generation of the dungeon map at runtime. If true, after the dungeon is generated at begin play it will override the map render target with the current path tiles, and then add the mini-map widget to the viewport. If this is off the render target will save the map of the previously generated dungeon.
Dungeon Type
This dropdown sets the type of generation to use for the dungeon. The three options are Classic, creating a maze like dungeon that can loop back on itself, Rooms Only, which creates a grid style dungeon of large rooms with single tile connecting corridors, and Central Path which creates a direct path from the first room to the boss with all other paths branching off of the first and ending without looping back.
Seed
New or old seeds can also be set manually in the map settings. Dungeons will always generate the same when using the same seed and settings.
Room Size
Rooms generate X and Y grids with each side ranging from Room Size Max to Min. In most dungeons the Boss room is the exception to these settings and always spawns with max X and Y size. Adjust these settings to control base size and range in size of all other rooms. When generating a Rooms Only dungeon, all rooms will be set to the max X and Y scale, only allowing small single tile spaces between them.
Room Count
By default the dungeon spawns 5 rooms ending with, and including the boss room. Adjust the room count to make the dungeon as long as you desire. The last room in the dungeon will always be the boss room as long as the dungeon is at least 2 rooms long.
Custom Rooms
Custom rooms are blueprints that allow you to design your own unique room for the dungeon. While generating the dungeon will check this array and spawn the handmade rooms throughout the dungeon either randomly, or at specific points that can be setup within the array settings.

Do Paths
Checking this changes the generation from spawning one long dungeon with the same tileset from beginning to end, to spawning multiple smaller paths each with their own themed tilesets, until the max room count is reached.
Path Lengths
Similar to RoomCount, each path has a minimum and maximum number of rooms. When generating, each path is assigned a length between these values until the max room count has been reached, at which point the boss room will be spawned and the path will be cut off.
Spawn Keys in Previous Path?
Checking this guarantees that when generating keys and locked doors, the key for each path will be placed in a random room along the previous path, controlling progression through the dungeon. If unchecked, the key for a new path will be spawned in any previous room of the dungeon allowing keys to be found out of order. The key will still always spawn before the first door that requires it.
Floor Culling
Floor culling removes grid spaces from all rooms, allowing for more unique and varied shapes. When culling each room the generator removes a random number of tiles between the Max and Min Floor Cull variables. Adjust these to control the amount of tiles that are removed from each room, or uncheck to only generate solid rectangular rooms.

Branching
Branching is checked by default and allows rooms to spawn off of any previous room in the dungeon, breaking up the flow and allowing multiple long side tracks and loops in one dungeon. If unchecked the dungeon generates linearly, occasionally only branching if a corridor happens to loop back through a previous room, or if a room is unable to be spawned off of a dead end.
If branching is checked each new room in the dungeon will decide if it will continue off the last room or branch off of another, depending on the branching chance, with a chance of 1 being 100% and 0 generating a linear dungeon.
If path generation is turned on, the first room of each new path will follow this logic and branch off of a previous room along the dungeon. Following rooms within a path generate linearly, only branching and creating another path if a dead end is created before the path is complete
Wrap Corridors
When building a corridor to a new room, the generator can build bridges or paths through the center of previous rooms that are in the way. If this is checked, the dungeon will instead offset these corridors by the minimum room size, either wrapping along the edge of the room, or building around the room entirely.
Truncate Corridors
In larger dungeons corridors can overlap or intersect. Check this to cut overlapping corridors into one to avoid multiple loops back to the same rooms
Leveled
If Leveled is checked, the dungeon will be built with height variation between rooms. Each new room will be built either 1 tile below, one tile above, or at the same level of the previous room. Corridors are then be built between the two rooms at the height of the lowest room, with a staircase through the floor of the higher room. If a corridor passes through a previously built room any tile above the floor level, the dungeon will build a bridge through the room with doors on either side.

Varied Room Height
If allowed in the datatable, rooms will generate at with a random height between 0, being one tile tall, and the max room height set by the generator. Uncheck this to only generate rooms with a height of 1 tile. If a room type in the datatable is set to a locked room height each room of that type will ignore this setting and generate at the locked height, or the max room height of the dungeon.
Max Room Height
When building rooms with a height greater than one tile, the dungeon will randomly choose a height between 0 and this height. If a room type in the datatable is set to a locked room height that is higher than this number the rooms will be locked to this height.
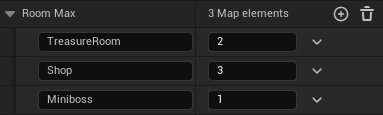
Room Max
During generation the dungeon randomly assigns each room a type from all valid unique room types declared in the datatable until each specified type has reached its max room number.
If a room theme is not set to be a path theme it is added to this dictionary of unique room types and by default generates once per dungeon. When adding new rooms to the datatable, adjust the max number of that room type you want to be able to appear. Depending on the size of the dungeon the max number is not guaranteed and it is possible to not generate any of a specific room, however in large dungeons this allows multiple rooms to get a chance of spawning and greater variation during gameplay

Remove Entrance Ceiling
Checking this removes the ceiling tile at 0,0,0 in the center of the first room, to create an entrance into the dungeon. This hole is stationary regardless of seed allowing for a consistent entrance for any dungeon.
Remove Entrance/Exit Walls
Checking these boxes creates an entrance and exit corridor leading into the first and last rooms respectively. When these are checked the generation adjusts to avoid cutting off the entrances, locking room spawning to a higher X value than the first room, and moving the Boss Room to the greatest X value of the dungeon on the opposite end
Data Table
This is the datatable used by the generator for constructing paths and themes. By default it is set to the default datatable DT_Default_RoomData. Switching this out allows you to generate multiple dungeons throughout your game, each with custom datatables based on the area or need of the level.
Dungeon Fog
Checking this adds an exponential height fog component to the dungeon, set up to support volumetric fog. With this active the Dungeon fog blueprints will fill the rooms they are spawned in, adding colored volumetric fog to the dungeon. The fog meshes and blueprints can still be spawned by the dungeon but they will not be visible without an exponential height fog actor or component in the level
Adding Room Themes
The base Generator comes with two room types, Default and Boss. Default rooms have a short and tall variant and make up the first room, and any other room in the dungeon that doesn’t have a unique type. The Boss Room always spawns as the last room in the dungeon and is by default is set to always be a tall room with max dimensions to allow space for a large arena.
Adding Custom Themes:
To add a new room theme, open DT_Default_RoomData in the Data Folder
Select the Add Button at the top of the screen and name the new data row to the type of room you want to make
Adding Custom Meshes:
Add your desired meshes to the arrays for each room component: Ceilings, Floors, Walls, Door Frames, Inner Corner, Outer Corner, and Stairs
Adding multiple meshes to the arrays increases the variation of the dungeon and rooms.
For each room type all room components must be filled for the room to build correctly. If you don’t have custom meshes for each component just fill the component slot with a default mesh.

By default rooms generate with a height of 1 tile equal to the GridScale. If you want rooms to be taller check the AllowHieghtVariation box. If Varied room height is true the dungeon will randomly choose a height for each room between 1 tile and the max room height of the dungeon.

If you want the new room type to only generate as a specific height check the LockHeight variable and set the LockedHeight float to the desired height. If these variables are set each room of the selected type will generate at the locked height as long as it’s less than or equal to the max room height of the dungeon.
Adding Room Trims
The room trim is a material instance that is applied to the 01 material slot of dungeon walls and door frames to add an extra layer of detail that can distinguish similar looking rooms. If left blank the dungeon will spawn the wall mesh as is.
Room Color
The room color is the color assigned to the room tiles when filling in the mini-map.

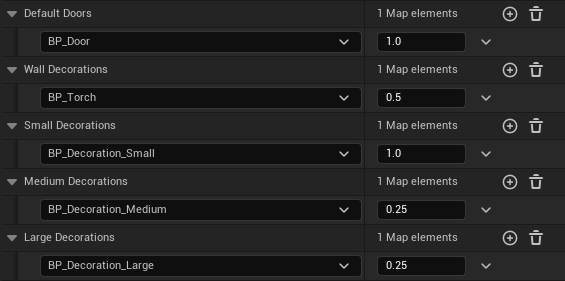
Adding Decorations:
Decorations are room specific blueprints that are spawned after generation to populate and bring a dungeon to life. They are broken down into Doors, Wall decorations, and 3 sizes of floor decorations, being large, medium, and small.
To add a decoration add at least 1 item to the map of the decoration you want, and select your desired blueprint.
Set the float to the right of the blueprint to control the likelihood of that decoration spawning on a tile, with 1 being 100%
Adding multiple items to each blueprint will increase the variety of decorations the player will encounter while exploring your dungeon
After the dungeon is built decorations are spawned, with doors spawning at every room and corridor intersection, wall decorations are randomly scattered on tiles adjacent to walls, and floor decorations fill all valid floor tiles in order starting with large, then medium, and finally small.
Decorations can be any blueprint including enemies, interactables, or obstacles.
The decoration offset is applied to the z transform of decorations when spawning. This can be used to ensure decorations spawn correctly on floors that have height variation or have a surface with a different height than the origin of the tile like the default boss room floors.
Room Features and Central Decorations:
Room Features and Central Decorations are unique Decorations that spawn on the Center tiles of each room, regardless of floorspace. When clear tiles is set to true the generator will fill in tiles and move corridor endpoints to the edge of each room along this path to ensure these decorations have the room to spawn without issues. Any corridors that pass through the room will also be overridden to wrap around the room instead.

Central Decorations
Like other decorations add at least one blueprint to the central decorations List and assign a spawning probability between 0 and 1. When spawning a central decoration the generator will pick a random blueprint from this list based on the probability of each one. Since theses decorations ignore floorspace availability you will need to check ‘Clear Central Tiles’ to ensure the decoration doesn’t block paths or clip other spawned actors.
Room Features
Unlike other decorations every Room Feature listed will attempt to spawn in each room based on the probability assigned. By default this system is used to spawn Light managers, which load and unload point lights as the player enters and exits the room, and Local Fog blueprints. Since the room will attempt to spawn every blueprint listed, this can be used to spawn multiple overlapping blueprints that can add different room specific effects without blocking other decorations or relying on available floorspace.
Central Feature Size
This is the max X or Y size of the Central decoration. When filling in tiles the generator will clear a square of this many tiles around the center tile of each room. If this is set to a number higher than the minimum room size it will default to the min room size during generation.
Manual Room Theme:
Custom Rooms can be assigned their own themes and will only spawn central features and wall decorations procedurally. Check this as true if this theme is intended for a custom room to avoid assigning it to a procedural room and save time when spawning decorations.
Path Settings:
Each custom room type can be set as a unique room, such as a shop or event room, or can be set to generate as the theme of a full branching path.
If CanBePathTheme is checked, this room theme will be applied as the default theme when generating a branching path and will no longer spawn if paths are turned off. Other unique rooms can still be spawned along this path.
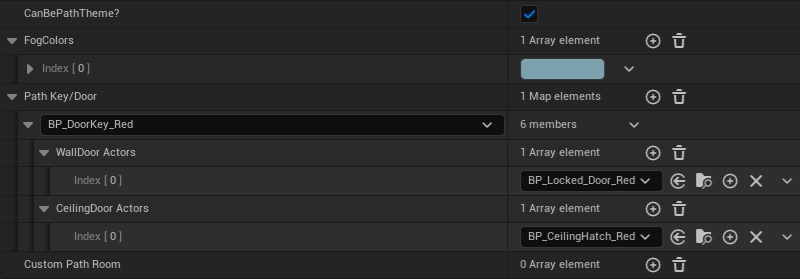

FogColors can be set to apply a specific color or create a specific list of colors that can be applied to fog volumes spawned within this path. If Local Fog is spawned as a room feature it will first apply this color, or select a random color from this array. If the array is left empty the blueprint will generate a random color for the path instead.
Paths can be assigned custom key and door combinations that will spawn in place of each door of the path. Each key can be assigned multiple WallDoor actors and CeilingDoor actors. When constructing doors the dungeon will pick a random key from all keys listed here and place it in a previously generated room. It will then replace each door along this path with with a random door assigned to the key.
If your keys and doors use event dispatchers, or need extra setup after spawning, open the spawn decorations function and navigate to the Spawn Keys and Doors section. At the end of the main loop there are two sequence nodes for execution, a reference to the currently selected Key, and references to the most recent Wall and Ceiling Door actor. With these references, cast to your desired door actors and call any functions or variables you would like to link. For event dispatchers, you can use the key reference to link each following door to the previous key’s event dispatcher
(Note: The Defined keys must be able to interact and unlock all door blueprints assigned to them. If a door blueprint is not already set up to be unlocked by the selected key, or does not have a predefined Key Variable to assign in the event dispatchers section, the dungeon generator will not be able to connect them. This could lead to softlocks and dead ends.
If the Path Key/Door dictionary is empty, the dungeon will randomly assign the path a key/door pair from any available combinations declared in the details panel of the dungeon, or fill each door with the default door blueprint of the theme.
Custom Path Rooms can be added to spawn specific custom made rooms along the path. Once added these can be set to spawn at the beginning, end, or at a specific or random available point along the path as long as the path is long enough to spawn it. Rooms added here in the RoomData will override any dungeon spawned rooms. This means if you add a custom boss room to this path and a custom shop room in the Map settings, if both rooms generate as the 14th room of the dungeon the boss room will spawn instead of the shop.
Final Setup
Once all settings have been filled in Save the datatable and recompile the dungeon blueprint to update it with the new room type.
Select the dungeon in the level and locate the Room Max setting in the Map Settings Section of the details Panel.
Each room type that is not set as a path theme is considered a unique room type and is listed here, spawning once per dungeon by defaultLocate your new room type and adjust the Room Max number to increase the number of times that room can spawn in your dungeon.

Making Custom Rooms
Along with procedurally generated rooms, the generator supports custom rooms that can be designed in blueprints and added to the final dungeon. The generator comes with two Custom room Blueprints, a Parent Blueprint and an example Chamber Blueprint. These blueprints are mini generators that allow you to design, block out, and decorate unique encounters and experiences for your dungeon, which can then be spawned randomly, or at specific points through your procedural maps.
Adding Custom Rooms:
To design a new custom room, create a child of BP_Custom_Room_Parent and name your new Room
Open the blueprint and switch to full blueprint editor, then open the Class Defaults to begin designing your room
To View your room while editing make sure ‘View Tiles?’ is set to true in the Editor Tools section of Class Defaults
Dungeon Settings:
Seed
This is the seed of the main dungeon. The seed controls random culling in the room and the spawning of multiple tile types. Culled tiles are carried over to the dungeon regardless of the seed so you don’t need to match the room seed with the dungeon if you don’t want, however if you’re using multiple wall or floor tiles aligning the seeds will allow you to visualize exactly what tiles will be spawned when the room is built in the dungeon
Room Size Min/Max
The room size of the dungeon determines the max and min size of the custom room. Align these with the Dungeon settings to ensure your room will spawn within the expected bounds of the generator and procedural rooms will not overlap or block off parts of your room
Grid Scale
This is the scale of the dungeon generator's grid. If you wish to use a grid other than 500x500 or different from the grid size of your tileset, adjust this parameter to scale the dungeon to the desired grid. All meshes and decorations will scale accordingly to fit within this new grid.
Model Scale
This is the scale of your desired static mesh tileset. The default tiles are built on a 500x500 grid. When choosing or importing a custom tileset enter the scale of your modular grid so the models can be scaled appropriately when choosing a grid scale for the generator.
Data Table
This is the theme datatable used by your dungeon. When spawning the room the generator will find the room theme within its datatable to save and spawn the room tiles. Make sure this is the same table to ensure the generator will be able to find and apply the correct theme during generation.
Room Settings:
Size X/Y
This is the X and Y size of your room, adjust these to find the max bounds of your room as a rectangle. The room can be further shaped from here, however corridors will connect to the room on the far walls at these bounds.
Room Height
This is the max Height in tiles of your room. A height of zero is one tile tall, and any number entered will be the number of tiles added above the base height
Room Type
This number is the theme number within your Theme Datatable. Find the theme you want to use within your datatable and enter the number here so the dungeon generator can locate and apply the same theme when generating the room within the main dungeon.
Cull Tiles?
This turns Tile Culling on and off within the editor. Turning this off can help visualize the full room and decorations when removing lots of tiles, however it must be set to true when adding your room to the generator to ensure the tiles are removed when its spawned in the dungeon.
Random culling
Set this to true to randomly cull tiles within the room. Random culling works the same as the main generator, using the seed to randomly remove tiles from the room within the Random Cull Min and Max range
Editor Tools
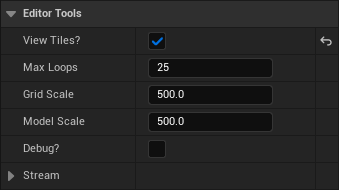
View Tiles?
This toggles the tile spawning within the Blueprint Editor, allowing you to see changes you make to the room within the viewport. Turn this off when you’re done editing the room before adding it to the generator to save time and processing during generation.
Max Loops
Like the dungeon generator, this determines how long the blueprint will search for a valid tile to randomly cull without failing out. Increase this number to reduce the chance the blueprint will fail to randomly cull tiles from the room.
Debug?
This toggles the Debug overlay in the editor. Toggle this to visualize the full bounds of your room while editing


Shaping your Room
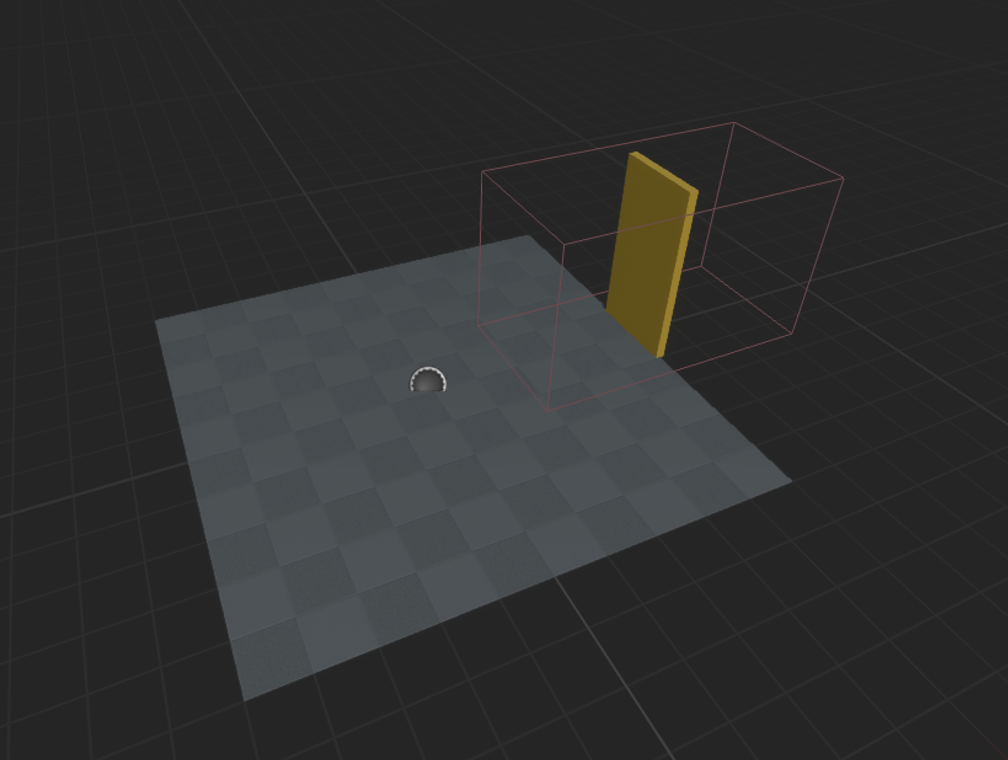
Once your room bounds are set up you can edit the shape and manually remove tiles with volumes.
Under Components add a Box Collision Volume and name it CullVolume
Set the box Extents to 250 x 250 x 250 and drag it to overlap a section of your room.
It helps to align it to a room tile and set grid snapping to 50, 250, or 500 to keep it aligned when shapingScale the volume to overlap any number of tiles you wish to remove from the rectangular room.
Red Debug Boxes are displayed over tiles where corridors will attempt to connect to the room. Avoid removing these tiles to prevent the chance of softlocking players or making the room inaccessible.

Adding Decorations:
Decorating your Custom room works as if you were building a level in the main editor select any decoration blueprints, or static meshes and drop them into your room. When building the dungeon any random or themed floor decorations will be blocked within custom rooms and the generator will loop through and respawn any non-volume child blueprints or static meshes within the blueprint.
Decorations within custom rooms don’t need to be aligned to the grid, however you should avoid clipping through walls or the floor in case a corridor spawns on the other side
Corridors and doors will attempt to wrap around rooms and only connect within the red tiles, however if a room is significantly larger than the minimum room size there is a chance wrapped corridors could intersect the corners of rooms and build doors. Be cautious when adding decorations against or near walls to avoid the chance of a decoration blocking a doorway.
Wall decorations and Room Features set in the room theme settings will still be spawned, allowing procedural decorating of walls and the spawning of central features and volumes that will communicate with the generator.

Repeat this with as many Cull volumes as you like to shape your final room
You can Use the Cull Tiles Boolean to toggle tile culling and view your changes compared to the original room.

Once your volume is where you want it, open the construction graph and add a call to the function “Add Culling Volumes” before the parent construct node
Add a Make Array node with your CullVolume, and feed it into the function, then compile the room and any overlapping tiles will be removed.
Final Setup
Once all the room settings have been filled in and you’re happy with the custom room, make sure Cull Tiles is set to true and View Tiles is set to false, then compile and save your blueprint.
Select the dungeon in the level and locate the Custom Rooms Array in the Map Settings Section of the details Panel, or open the RoomData datatable and locate the Custom Path Rooms array of a path you want your custom room to spawn in. Add a new room element and fill in the settings for your custom room.
Room Blueprint
This is the blueprint of your room. Drag and drop it here from the Content window or select it in the dropdown
Room Placement
This is where the room will spawn in the dungeon. Custom rooms can override the First or Last room of the dungeon allowing for easy custom entry or boss rooms. All other rooms should be set as middle rooms.
Room Number
With this you can control where in your dungeon a room will spawn. First and Last rooms will always spawn at the beginning or end of the dungeon, however middle rooms can be set to a specific room number.
Middle rooms with a room number of 0 will be randomly placed somewhere in the dungeon based on the dungeon seed.
Any middle room with a number between the first and last room will be spawned in place of that room, allowing for more control over the order custom rooms are encountered.

Decorations
On Begin Play the dungeon is populated by all decoration and door blueprints. Doors are spawned in the door frames generated on construct, and the floorspace of each procedural room is filled with varying sizes of decoration blueprints.
Doors:
Doors spawn in the intersection of each room and a corridor. After building a corridor the generator will get the theme of the new room and loop through the list of associated default doors until one is allowed to spawn based on each of their spawn likelihood. If keydoors are available to spawn, the dungeon will always spawn a locked door before spawning the default door except in the default theme. Doors spawn in the center of the hall tile next to a room and must have a transform of 250 in the X direction within their blueprint to align correctly with the dungeon walls and door frames.
Wall decorations:
Wall decorations spawn in the center of every tile adjacent to a wall, if allowed by their spawn likelihood, and are then rotated to align with the wall. To spawn decorations against the wall, the desired mesh must have a transform of 250 in the X direction within the blueprint
Floor Decorations:
Room floor tiles can be populated by any decoration blueprints from enemy spawners to traps and puzzles. Blueprint’s locations are decided by searching the grid for space and filling all available spaces in a room starting with large, then medium, and the rest with small decorations.
Decorations may be any blueprint you desire but the three sizes must fit within the allowed grid size so they don't overlap or block doorways
Large decorations have a footprint of 2x2 tiles
Medium decorations have a footprint of 2x1 tiles
Small decorations have a footprint of 1x1 tile
While the dungeon layout is generated on construct, Decorations and Interactables are spawned on begin play using the Spawn Decorations function.
If a decoration blueprint needs extra setup on spawn or could benefit from the dungeon seed, open the spawn decorations function and navigate to the end of the sequence branch for the decoration size you want to reference. At the end of each branch there is a sequence node for execution, a reference to the actor that was just spawned, and a copy of the dungeon’s seed.
From this cast to the desired blueprint and call any function you require.


Dungeon Paths
Dungeon paths can be turned on in the map settings of the details panel. If checked the dungeon will be broken into smaller sections ranging in length based on the min and max settings provided, and each with their own themed tileset, default and locked doors, and decoration blueprints. When starting a new path the dungeon generator will choose a new theme from all available room types with CanBePathTheme checked.

Keys and Locks
If the selected theme has key/lock combinations set, the generator will randomly choose a key from that list and place it in a previous room of the dungeon, then set all doors to one of the associated locked door blueprints. If the selected theme doesn’t contain any key/lock combination the generator will randomly choose from the list of Unassigned Key Locks.
To add new keys and locks open the unassigned Key Locks tab and add a new entry. The left actor is the key blueprint that will be placed on a random tile of the dungeon before the first room of the path. The right actor is the door blueprint that requires the associated key to open and is placed on every open door tile within the path, overriding the default doors.
Keys and locks are both blank blueprint actors and can be set to anything from physical keys, to powerups, to enemies.
Note: After spawning both actors the dungeon generator doesn’t keep track of if keys have been collected or not, so the two blueprints must be able to interact with each other and be unlocked independently or through a separate system.